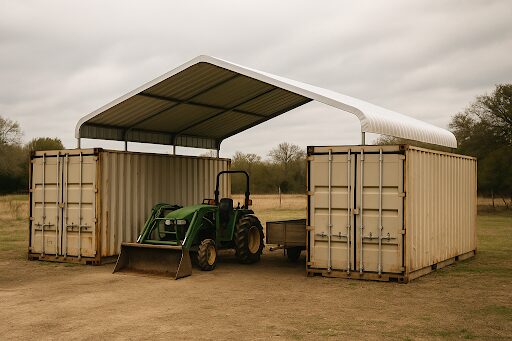
Out in the country, weather waits for no one—and neither do rust, rot, or UV damage. If you’ve ever watched your tractor seat pool with rainwater or your gear fade under the blazing sun, you know the value of a good shelter. But building a barn takes time, money, and permits. That’s where this genius DIY solution comes in: two shipping containers with a roof stretched between them.
It’s part garage, part storage vault, and fully rugged. In one weekend, you can turn a bare patch of land into a solid, weatherproof zone for your tools, machines, and weekend projects. No concrete pads. No heavy framing. Just two steel containers and a canopy that brings it all together. It’s fast. It’s affordable. And best of all—it actually works.
Table of Contents
Why Two Shipping Containers and a Roof Just Works
Picture this: two rugged steel containers standing like sentinels, holding up a canopy that shields everything beneath. It’s not just practical—it’s genius. This setup blends simplicity with strength in a way few DIY projects can.
Shipping containers are already built to take a beating on the open ocean, so putting them to work on your land is a no-brainer. Rain? No problem. Sun? Blocked. Wind? Good luck. The containers create natural walls and anchor points, while the roof stretched between them becomes your shield from the elements.
Inside the containers, you’ve got lockable storage for expensive gear, fuels, or tools you don’t want wandering off. In between, you’ve got open-air workspace or shelter for tractors, trailers, and whatever else keeps your land running.
It’s the Swiss Army knife of rural structures—cheap to build, tough as nails, and endlessly useful. And unlike a barn or pole building, it’s modular. Need more space? Just add more. With this setup, you’re not just building a shelter—you’re upgrading your property in a way that’s fast, functional, and fiercely independent.
How to Set the Stage with Two Containers
The beauty of this build starts with placement. First, track down two 20-foot or 40-foot shipping containers. Twenty-footers are easy to move and fit on most properties, while 40-footers give you room to stretch out. Position them parallel to each other, about 10 to 20 feet apart, depending on what you plan to park or store in between. That gap becomes the backbone of your equipment bay, so think in terms of your biggest rig—be it a tractor, trailer, boat or ATV.
Before you place them, clear the ground and throw down a gravel base or concrete pads if you’ve got soft soil. Even railroad ties will work. Level footing matters—containers don’t bend, and you want your roofline straight. Use a tape measure, string line, and a buddy with a good eye. Once they’re set, brace each container with heavy-duty blocks or anchor plates to prevent shifting. From there, you’re ready to build upward. These steel beasts aren’t just your walls—they’re your frame, your foundation, and your future storage. Set them right, and the rest of the build becomes a breeze.
Raising the Roof – Your Shelter’s Crown Jewel
The real magic happens overhead. Between your two steel titans lies the perfect span for a custom canopy—your crown jewel. You can opt for a prefab shipping container canopy, or you can go the DIY route.
For the frame, you’ve got some DIY options: steel tubing, wooden rafters, or even repurposed oilfield pipe if you like a rustic, industrial look. Secure these beams to the container corner castings or weld brackets directly into place. Once that frame is up, it’s time for cover.
If you want a quick win, go with billboard vinyl tarps—giant, waterproof, UV-resistant, and dirt cheap. Want a permanent setup? Corrugated metal roofing looks clean and lasts decades. For the best of both worlds, use a tarp first, then upgrade later. Add slope for water runoff (front-to-back or side-to-side), and don’t skimp on fasteners—wind loves to test shortcuts. Ratchet straps, eye bolts, or welded plates will keep everything tight.
You can even add extras: gutter systems for rain catchment, shade cloth extensions for the sides, or solar panels for off-grid lighting. This isn’t just a roof—it’s your weatherproof shield and utility platform all rolled into one solid build.
Build It in a Weekend – The Fast-Track Plan
You don’t need a construction crew or a month off work to get this done. In fact, if you’ve got the containers set and your materials ready, you can knock out the core build in a weekend. Start early Saturday: prep your site, confirm container placement, and double-check your spacing. Once everything’s level and locked in, begin installing your roof frame. A couple of sawhorses, a ladder, and a good cordless impact driver will take you far.
By Saturday afternoon, you should be laying your roof panels or stretching out your tarp. Ratchet everything down tight and test for sag or gaps. Sunday’s the day for finishing touches—seal the connections, add temporary side curtains if needed, and sweep out your new storage space. Hang a few hooks inside the containers, maybe even rig up a solar-powered light bar for nighttime work.
By sundown, you’ll be standing in your own weatherproof work bay, sipping something cold, wondering why you didn’t do this years ago. It’s that fast. It’s that satisfying. And the best part? It’s yours—built by hand, built to last.
Bonus Ideas That Make This Build Even Smarter
Once the main shelter is up, the fun really starts. Those two containers aren’t just structure—they’re blank slates for smart upgrades. Turn one into a full-blown workshop with shipping container shelving pegboards, and power tools. Line the other with racks for fuel, fencing supplies, or anything else you need locked down and out of the weather.
Looking to go greener? Add solar panels to the roof and run LED lights or charge your power tools straight from the sun. Want more protection? Hang roll-up tarps or barn doors on the open sides for quick weather shields. You can even use the rooftop space for water catchment, hay storage, or a lookout deck if you’re feeling bold.
Need extra floor space later? Drop in another container and extend the roof. This build scales like LEGO—just add pieces. It’s not just a shelter. It’s the foundation of a rural command center, a low-cost launchpad for whatever you’re building, fixing, or dreaming up. With a little imagination, these containers become more than storage—they become the heart of your land’s operations.
Two shipping containers and a canopy roof create a fast, affordable shelter that’s tough, flexible, and easy to build. In just a weekend, you can protect your gear, gain secure storage, and open up workspace—all without breaking the bank. It’s the ultimate DIY setup for rural living: rugged, expandable, and ready for whatever your land demands.