
Table of Contents
Objective:
The primary objective of this job is to determine the configuration of ground level by surveying and drawing longitudinal and cross-sections of the road.
Apparatus:
- Dumpy level
- Tripod stand
- Leveling staff
- Ranging rod
- Steel tape
Least count of the instrument:
Least count of the dumpy level = 0.005m or 5mm
Least count of the steel tape = 0.001m or 1mm
Related theory:
Profile Levelling
The procedure of finding elevations at different points at short measured intervals along a fixed continuous line is called longitudinal or profile leveling. It is very a practical application of running levels and vertical distance measurements. The results obtained are plotted to get a profile showing a vertical cross-section. These profiles are widely used for designing roads, sidewalks, curbs, pipelines, etc.
Cross Sectioning
Cross sectioning is a method to determine the characteristics of ground on either side of the proposed routed centerline. Levels are measured at a right angle to the direction of the road end at suitable intervals and leveling is performed along the cross-section.
Design of highways, railways, and canals, and other marks are positioned at various aligned points and the undulation of the ground along the fixed line is adjoined.
The line of the section may be straight or it may change directions. Cross-sections are taken at each 10-meter distance from the centerline and the length of the cross-section relies on the nature of work and topography of the ground.
Setting and leveling of dumpy level:
Firstly, fix the dumpy level on the tripod stand. Adjust the convenient height of the instrument. After ensuring that the instrument is firmly secured to the legs of the tripod stand and that the legs and fittings are not loose, set up the instrument by spreading the legs evenly at a convenient and safe angle, thrusting two legs firmly in the ground.
Take the third leg of tripod and move it on the ground, until the instrument becomes as level as possible. Slide the leg in towards the instrument (5-10 cm) and press the third leg hard into the ground, such that the top of the tripod becomes leveled. Bring the screws in the center of the run such that they are at the same height.
Now, bring the telescope on any one pair of foot screws by using the forefinger or thumb to move both screws in the opposite direction such that the plate bubble comes in the center.
Now, move the telescope degrees clockwise and use the third screw along with, for centering the bubble. Repeat the process two to three times. The bubble should remain in the center for all the positions.
Procedure:
- Suppose, ABC is the line of section set out on the ground and marked with wooden pegs that are driven at equal intervals (in this case 20 to 30 meters).
- Set up the dumpy level and carry out its initial adjustments on one side of the profile to avoid too short sight on the points near the instrument and take care to set up the level roughly halfway between two change points.
- Firstly, perform leveling from the benchmark having known value.
- Record staff readings from pegs already driven into the ground at fixed intervals from each setup and also at those points where variations occur such as slope, land features, etc.
- Record all these readings are along with their respective distances measured through steel tape in the field book.
- Note down data regarding weather, time, etc. before starting survey work into the field book.
- When the length of sight exceeds the telescope range which is generally 100 meters, foresight is taken on the point of change.
- Shift, set up, and level the dumpy level to take back sight on the change point. This change may or may not lie in the line of section.
- Continue this whole procedure of chaining and reading along the line till the whole section is completed.
- Check the performed work in the progress of leveling by taking readings on other benchmarks, on the way, or on benchmarks fixed by differential leveling.
- Record the fore and back bearing of the section line.
- Draw neat sketches of the benchmark, change points, and other features such as roads, canals, etc.
- Draw the line crossing the section and describe it in detail in the remarks section of the field book.
- Represent the procedure and corresponding readings and values in the field book on pages related to the part of the road project.
- The procedure and its respective readings and values are written down on the page of the field related to that part of the road project.

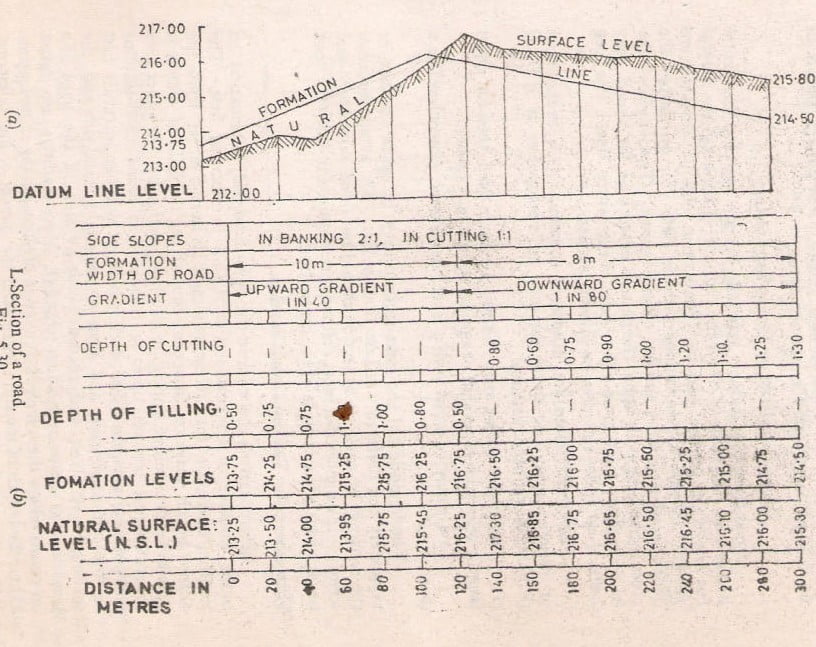
Plotting the Longitudinal section
Level Book
When ever leveling operation is carried out the staff reading taken in the field are entered in the note book called a Level-Book. Each page of it has the following columns which help in booking of reading and reduction of levels.
Page of Level-Book

Results & Discussions:
The longitudinal sectioning & cross-sectioning of the road is performed successfully and the profiles and cross-sections have been plotted on the graph sheets.
Precautions:
- Make sure the legs of the stand stay firmly fixed into the ground.
- The bubble should be exactly in the center for precise measurements.
- The upper and lower stadia as well as the object should be clear when seen through the eyepiece.
- Once the level is set, it should not be moved.
- The leveling staff should be kept vertical by holding it with both hands while standing behind it.
- The bottom of the leveling staff should be kept clean surface.