It is a surveying instrument and angle-measuring device which is used in the field. The working of prismatic compass is based on the magnetic bearing principle, while the reading is taken from the prism attached to the compass. The reading of the prismatic compass is in the form of Whole Circle Bearing (WCB).
Table of Contents
Parts of Prismatic Compass
 To better understand the working and schematics of the prismatic compass, the authors usually divide it into three parts mentioned below:
- Eye Piece
- Object Piece
- Metal Box
Each part provides a specific function and use. Now each part will be discussed in detail by mentioning its sub-parts.
1)Eye Piece:

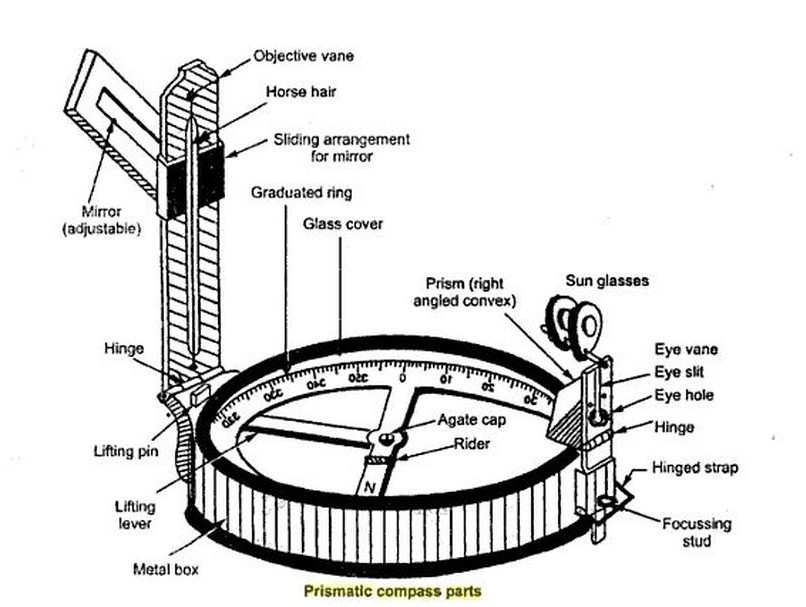
Figure:1 Prismatic Compass (Plan View)
It is that portion of the Prismatic Compass which is close to the viewer’s eye. Its function is to help the user in sighting the object and then in taking the reading. It consists of the following sub-parts:
i)Prism:
In an eyepiece, there is a triangular prism made of glass, which is covered and secured by a metal box usually called Prism cap. There is an opening on the metal box called the eye slit, through which the viewer can see the reading on the circular ring. The prism acts as a magnifier to enlarge and erect the numbers on the ring for ease of the user.
ii))Focusing Stud:
Sometimes the surveyor could not properly see the numbers on the ring while noting the readings. This is because the prism is not focused correctly. To focus the prism, the level of the prism is either raised or lowered with the help of the screws available at the bottom. This helps in clarifying the image.
iii)Hinge:
To protect the prism when it is not in use, the hinge is available. This hinge makes it possible for the prism to be folded back.
iv)Sun Cover:
As the prism is used outdoors for the survey, direct sunlight is inevitable during work. Seeing through the prism, glare can be produced which can affect the viewer’s eye. Therefore, a sun cover is provided along the line of sight.
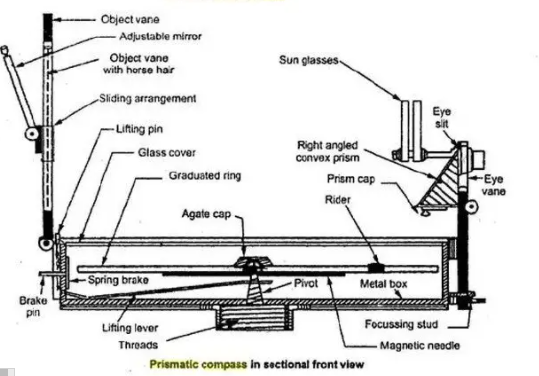
Figure 3 Parts of Prismatic Compass (Front View)
2)Object Piece:
This portion of Prismatic Compass is in front of the eyepiece. It helps to fix and station the compass correctly with respect to the object to be sited. The following parts make up an object piece:
i)Slit:
There is a slit rectangular in shape, with a wire in the middle. The compass s rotated until the object to be sited can be seen through this slit. While the wire should bisect the rod kept on the point for precise reading.
ii)Hinge:
To pack the compass back into its cover, the object piece needs to be folded on the circular glass. The hinge is provided to do exactly that.
iii)Lifting Knob:
Lifting know is the mechanism that connects the movement of the object piece to the magnetic needle inside the circular glass piece. When the object is lowered, the needle is lifted upwards to halt its function. This needs to be done to avoid mechanical errors in the working of the needle.
iv)Adjustable Mirror:
This mirror is provided on the outer side of the object vane. It helps in adjusting the object image inside the slit, in case the object is too high or too low from eye level.
3)Metal Box:
This metal box contains the assembly which indicates the WCB reading of specific points sighted by the object piece. The metal box is circular and made of brass. The outer diameter of this box is about 10cm and its height is 2cm. At the bottom, it is threaded to fix it on the tripod.
i)Glass Cover:
There is a thick cover made of glass that is transparent. This cover protects the inside assemble from external factors.
ii)Pivot:
It is a sharply raised surface in the middle of the metal box. On the pivot, the ring is supported and can freely rotate.
iii)Brake Pin:
To slow down the motion of the ring, a brake pin is provided just below the object piece.
iv)Lifting lever:
A lifting lever is provided below the metal box. It lifts the ring upward from the pivot, thus avoids any discrepancies in pivot sharpness.
v)Ring Needle Assembly:
There is a circular ring made of aluminum and is graduated in degrees. The minimum reading that can be read from the ring is 30’. Its readings are in the WCB system and range from 0 to 360 degrees. There is also an aluminum needle that is attached to the ring. The needle points in the direction of magnetic north irrespective of the position of the compass.
Uses of Prismatic Compass:
- Prismatic Compass is an instrument that is widely used by surveyors to plot the details of the site on paper. It is used only for angular measurements. These measurements are expressed in the form of a WCB system which means that they are taken with respect to the magnetic line.
- Such compass is generally used for a preliminary survey of the site, a survey done by it is relatively easy and quick.
Advantages of Prismatic Compass:
- A prismatic compass is light in weight and small in size. This makes it easy to carry.
- Operating of Prismatic compass is easy and quick. It does not consume a lot of time.
- It can be either operated on hand for rough measurements or can be mounted on a tripod stand for accurate readings.
- It can take the readings of all the site details from just one station. Stationing the compass on a suitable point can be enough to plot the area.
Disadvantages of Prismatic Compass:
- It is not a very accurate instrument when compared to other angle-measuring devices like Theodolite. It cannot be used to perform the main survey of the site.
- As it is a mechanical instrument and not a digital one, there is always some possibility of some mechanical or human errors.
- Prismatic compass readings get affected by the presence of magnetic materials in the site because it disrupts the magnetic north.
Adjustment of Prismatic compass:
The following are the adjustments usually necessary in the prismatic compass.
a) Station or Temporary Adjustments:
- Centering
- Levelling
- Focusing the prism.
b) Permanent adjustments:
The permanent adjustments are those which are done only when the fundamental relations between the parts are disturbed. They are not required to be repeated at every set up of the instrument. It includes
- Adjustment of levels.
- Adjustment of sight vanes.
- Adjustment of needle.
- Adjustment of pivot point.